Master Poured Fondant: Glaze Desserts Without Wasting Icing
Transform your homemade desserts into bakery-worthy masterpieces with the magic of poured fondant icing. This versatile and elegant glaze is the secret to achieving that smooth, professional finish on everything from delicate petit fours to hearty Bundt cakes, all while keeping your kitchen clean and your ingredients conserved. Forget struggling with overly thick or thin icings; mastering poured fondant means glazing your treats efficiently and beautifully, ensuring not a drop goes to waste.
Whether you're aiming for the dainty perfection of classic petit fours for a baby shower or simply want to elevate everyday cookies and cupcakes, a well-executed poured fondant can make all the difference. In this comprehensive guide, we'll demystify the art of creating and applying the perfect poured fondant icing recipe, ensuring you can glaze your desserts flawlessly without any unnecessary mess or expense.
What Exactly is Poured Fondant? Unveiling the Home Baker's Secret
Before diving into application techniques, it's crucial to understand what poured fondant truly is, and perhaps more importantly, what it isn't. Poured fondant icing is a smooth, pourable confection used to glaze cakes, pastries, cookies, and other sweet-breads with a thin, sweet sheen. It's often referred to as "petit four icing" due to its classic application.
Crucially, poured fondant icing should not be confused with rolled fondant. Rolled fondant is a pliable, dough-like sugar paste primarily used to cover entire cakes, creating a smooth, sculptural finish. While both are sugar-based, their consistency, application, and even flavor profile are distinctly different.
True fondant, in its most traditional form, is a sophisticated candy — the creamy center of a peppermint patty, for instance. Achieving this "true fondant" involves a meticulous process of controlled sugar crystallization, which can be quite unforgiving for the home baker. This is where the home baker's simple, powdered sugar-based poured fondant steps in. While it may not possess the exact high-gloss sheen of a professional true fondant, it offers an incredible compromise: it's easy to make, tastes fantastic, and delivers a beautifully smooth, opaque glaze that is perfect for a wide range of desserts. It's an accessible and delicious solution that empowers you to create stunning glazed treats right in your own kitchen.
Achieving the Perfect Poured Fondant Consistency
The success of your poured fondant icing recipe hinges almost entirely on its consistency. It needs to be just right: smooth, flowing, and neither too thin nor too thick. The ideal consistency ensures a full, even coating without being so thick it's difficult to manage, or so thin it becomes transparent or runs off your treats completely.
Here’s the golden rule for testing: when you pour the icing slowly from a spoon back into the mixing bowl, it should fall in a smooth, flat ribbon that gently re-melds into the rest of the icing.
- Too Thick: If the icing breaks or globs when it falls, or if it doesn't smooth back into the bowl quickly, it's too thick. Add liquid (usually water, milk, or a flavored extract) a mere half-teaspoon at a time, stirring thoroughly after each addition, until the desired consistency is reached. Remember, you can always add more liquid, but it's harder to reverse if you add too much.
- Too Thin: If the icing pours like water, is transparent, or immediately disappears into the rest of the mixture without forming a ribbon, it's too thin. Gradually add sifted powdered sugar, a tablespoon at a time, until it thickens sufficiently.
Pro Tip: Ensure your powdered sugar is well-sifted before mixing your fondant. This prevents lumps and ensures a silky-smooth finish. Slightly warming your prepared fondant (gently, over a double boiler or in short bursts in the microwave) can also help achieve a more fluid, easy-to-pour consistency, especially if it has cooled down slightly.
Masterful Application Techniques: Glaze Without Waste
One of the most appealing aspects of a good poured fondant icing recipe is its reusability. With the right techniques, you can glaze an entire batch of treats and then easily collect and reuse any excess icing. This means less waste, more efficiency, and ultimately, more delicious glazed desserts!
1. The Pour-Over-a-Bowl Method
This technique is a classic for a reason: it's incredibly effective for coating multiple items and collecting drippings.
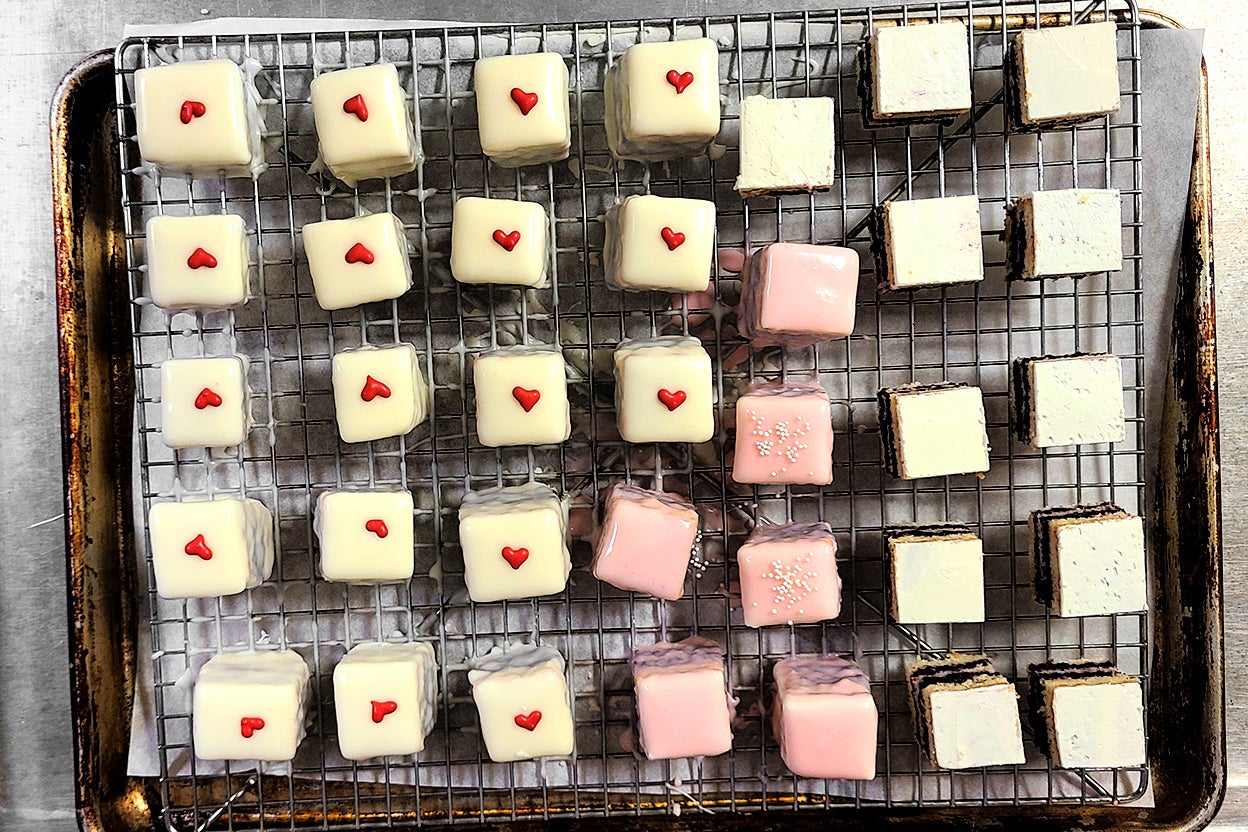
- Setup: Place your items (petit fours, cookies, cupcakes, small cakes) on a wire cooling rack. Leave about 1-2 inches of space between each item to prevent them from sticking together as the icing sets. Position this wire rack over a bowl large enough to comfortably catch all the drippings.
- Application: Using a large kitchen spoon, ladle, or even a small measuring cup, slowly and steadily pour the poured fondant icing over each item. Start from the center and let the icing flow naturally to the edges. Ensure complete coverage. The bowl underneath will dutifully catch all the excess icing.
- Collection & Reuse: Once you've coated all your items, carefully lift the wire rack. The icing collected in the bowl can be gently stirred and then poured back into your main icing bowl for reuse. If it has thickened slightly, a tiny splash of warm water can bring it back to the perfect consistency.
2. The Pour-Over-Parchment or Silpat Method
Similar to the bowl method, this technique offers another excellent way to capture and reuse excess icing, particularly convenient if you have large baking sheets.
- Setup: Line a rimmed baking sheet with either parchment paper or a silicone baking mat (Silpat). Place your wire cooling rack directly on top of this lined baking sheet, ensuring there's a slight gap or that the paper/silmat extends beyond the rack edges to catch all drips.
- Application: Proceed with pouring the icing over your treats as described in the bowl method. The flat surface of the parchment or Silpat will collect all the excess.
- Collection & Reuse: Once your items are glazed, carefully remove the wire rack. The beauty of parchment or a Silpat is how easily you can lift the edges and create a "funnel" to pour the captured icing back into your mixing bowl. This method is especially great for larger batches or when you want to avoid scraping icing from a curved bowl.
3. The Dipping Method
For smaller, more uniformly shaped items like cookies, donuts, or individual petit four pieces, direct dipping can be the fastest and most efficient approach.
- Setup: Pour your poured fondant icing into a shallow, wide bowl that allows you to easily immerse your items. Keep your wire cooling rack ready nearby.
- Application: Gently pick up an item (using tongs for delicate treats or your fingers if appropriate). Dip the top surface of the item directly into the bowl of icing, ensuring it's fully coated. Lift it out, allowing any excess to drip back into the bowl.
- Finishing: Place the dipped item onto your wire rack to allow the icing to set. This method is swift and provides a very clean, even coating.
Beyond the Glaze: Storing Your Poured Fondant
One of the many benefits of a good poured fondant icing recipe is its impressive shelf life. Properly stored, your homemade fondant can be ready for impromptu baking sessions whenever inspiration strikes. This makes it perfect for those moments when you need a quick glaze for cookies or a last-minute cupcake decoration.
Here’s how to ensure your fondant stays fresh and ready for reuse:
- Room Temperature: For 2-3 days, your poured fondant can be stored at room temperature. Simply transfer it to an airtight container. Before sealing, sprinkle a few drops of water over the surface of the fondant, then cover the container tightly with plastic wrap directly touching the surface of the icing. This prevents a crust from forming and keeps it pliable.
- Refrigeration: For up to a week, store your fondant in the refrigerator using the same method (sprinkle water, plastic wrap directly on surface, then airtight lid).
- Freezing: For long-term storage, poured fondant can be frozen for up to 3 months. Again, use the water and plastic wrap technique before freezing in an airtight container.
Reactivating Stored Fondant: When you're ready to use stored fondant, first pour off any water that has settled on the surface. Allow refrigerated fondant to come to room temperature, and thaw frozen fondant completely in the refrigerator. Gently rewarm the fondant (over a double boiler or in very short microwave bursts) and stir until it reaches your desired pourable consistency. You may need to add a tiny amount of warm water or sifted powdered sugar to achieve the perfect flow. For more detailed insights into preservation, be sure to check out Store Poured Fondant: Fresh Icing for Weeks or Months.
Conclusion
Mastering the art of poured fondant icing opens up a world of possibilities for your home baking. From the delicate charm of petit fours to the elegant finish of a glazed Bundt cake, this versatile glaze delivers professional results with minimal effort and, thanks to smart application techniques, virtually no waste. Embrace the simplicity and elegance of a well-made poured fondant icing recipe, and get ready to impress your friends, family, and even yourself with stunning, perfectly glazed desserts every time.
